MiniMax H3 Image Edit Prompt
Write MiniMax H3 Image edit prompts with clear reference roles, preserved details and target composition. See a real jewelry edit and its limits.
Read as MarkdownA useful MiniMax H3 Image edit prompt identifies the source object, describes the finished picture and states which details may change. “Make this look expensive” leaves the model to decide whether that means a different background, a different product or both. For a product photograph, that uncertainty can turn a good-looking image into an unusable one.
MiniMax's image-specific guide organizes an edit into one continuous paragraph: define referenced content, describe the target and each reference's relationship to it, then add the changed or new details.[1] This article applies that approach to still images. Many H3 tutorials cover video; their shot timing, dialogue and soundtrack templates do not describe this image-editing task.
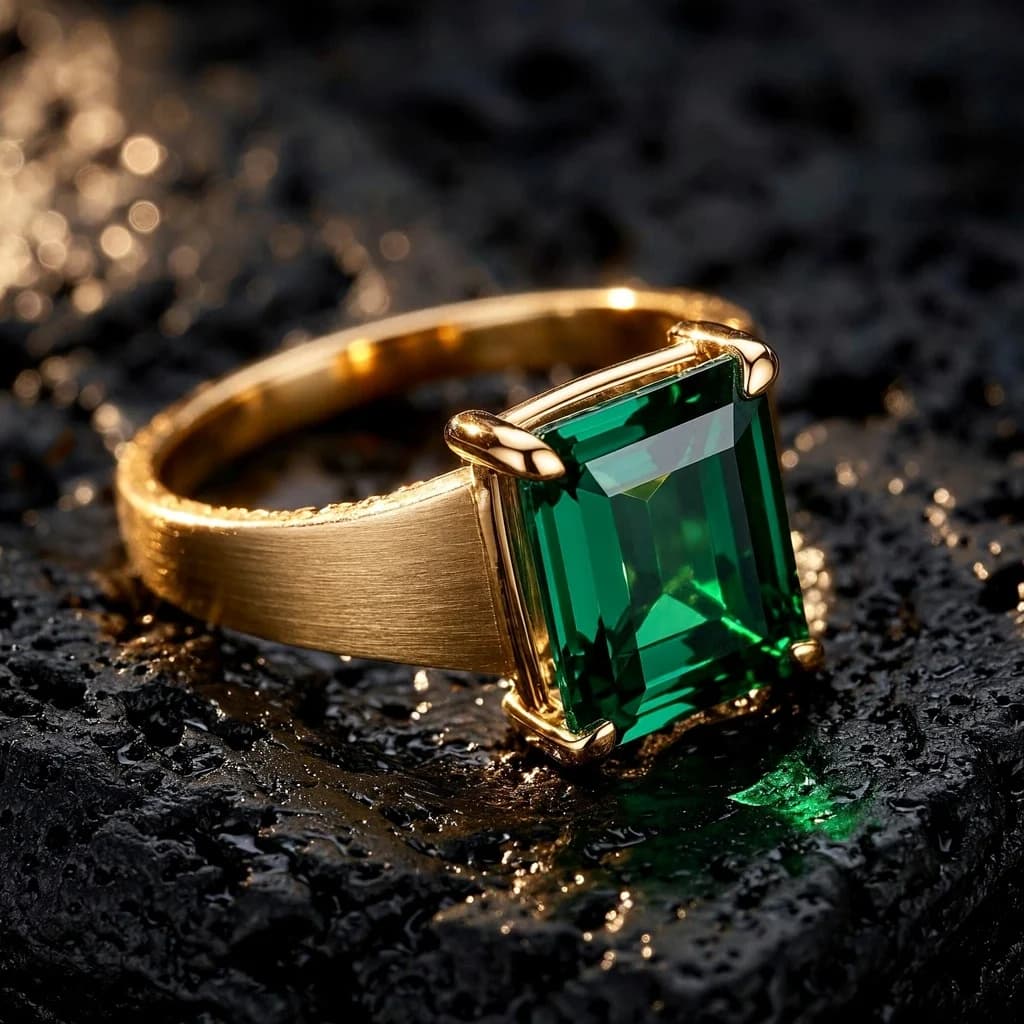
We also ran a reference edit: a green gemstone ring photographed on dark rock became an ivory jewelry scene. The result is shown below alongside the input. It is one example of background replacement and relighting, not a guarantee of exact product reproduction.
Give each reference a specific job
References are numbered in the order supplied. The first is <Picture 1>, the second is <Picture 2> and so on. MiniMax's official editing example uses the same ordering.[2] Before writing the prompt, inspect each image and decide which part contributes to the result.
An object reference may define a ring's shape. A second image may contribute a color, while a third supplies the layout. Those are different responsibilities. Asking to “combine all three” does not explain whether the model should copy the third image's objects, its lighting or just its arrangement.
The official guide uses <Subject N> labels for content that needs an independent relationship to the result. A subject can be a person, object, text block, background or property. You do not need one subject for every object in the frame, and one picture can supply several subjects. Keep the numbering stable throughout the paragraph.[1]
For example, an original brief might begin like this:
The gold ring in <Picture 1> is <Subject 1>. The pale stone surface in <Picture 2> is <Subject 2>. The target image is a square jewelry photograph with <Subject 1> resting on a new pedestal. <Subject 1> is partially preserved: its gemstone shape, band design and single-ring count remain, while its lighting and placement change. <Subject 2> supplies a weak material reference for the pedestal, with its form adapted to the new scene.This is an illustrative prompt, not another tested result. It makes the second reference a material source without asking the model to import everything visible in that picture. Use your own inspected references; do not describe hidden features or invent an exact color value from a small preview.
Separate preservation from the changes you want
“Keep the product exactly the same” is often followed by instructions to rotate it, move it and light it differently. These instructions compete. The official guide treats movement, rotation, duplication, relighting and new occlusion as changes to the defined subject.[1]
There are four useful relationships:
| Relationship | What the prompt should establish |
|---|---|
| Full preservation | The whole defined scope stays the same, including count, position, state, appearance and role. |
| Partial preservation | Name what remains and what changes. A relit product normally belongs here. |
| Attribute transfer | Identify the exact property and the target that receives it, such as a source color applied to a garment. |
| Weak reference | Identify the borrowed quality and explicitly allow the relevant adaptation. |
A color donor should not accidentally become a shape donor. If a ceramic vase supplies a jacket's color, copying the vase's glossy finish may be an unwanted change. Define the color as the borrowed property and describe how it appears on the jacket's existing fabric.
Preservation also needs a sensible scope. You cannot fully preserve an entire poster while changing a headline inside it. Define the headline separately, or mark the poster as partially preserved. If another prominent object sits beside the target, give it an explicit preservation instruction when the edit could affect it. A broad request to redesign the whole scene gives much less protection than a local change with clearly stated boundaries.
These instructions communicate intent. They do not turn generation into a pixel-locked editor. Compare the result with the input before using it as a product record or publishing readable data.
A real ring edit: dark rock to ivory paper
Our starting reference was a square image generated with MiniMax H3 Image Highspeed. It shows a rectangular green gemstone in a gold ring on wet black stone. We passed that completed image to the standard MiniMax H3 Image model as the only reference. The edit used area: "1K", aspect_ratio: "1:1", n: 1, JPEG output and prompt enhancement enabled.
The exact submitted prompt was:
Edit <Picture 1> into a refined editorial jewelry campaign. Preserve the exact rectangular green gemstone, gold band, corner prongs and ring proportions. Replace the wet black rock with a folded sheet of warm ivory paper, a pale stone pedestal and one soft curved shadow. Keep the ring as the focal point in the lower-right half of the square frame, tilted toward camera. Broad window light from upper left, restrained emerald and cream palette, realistic brushed gold and gemstone reflections. The ring must remain a single intact ring. No text, no logos, no watermark.This is a plain-language brief with enhancement enabled, rather than a manually completed version of every official subject label. It names the retained features and the replacement setting. It also asks for a new light direction, so it should be judged as a partial preservation task.
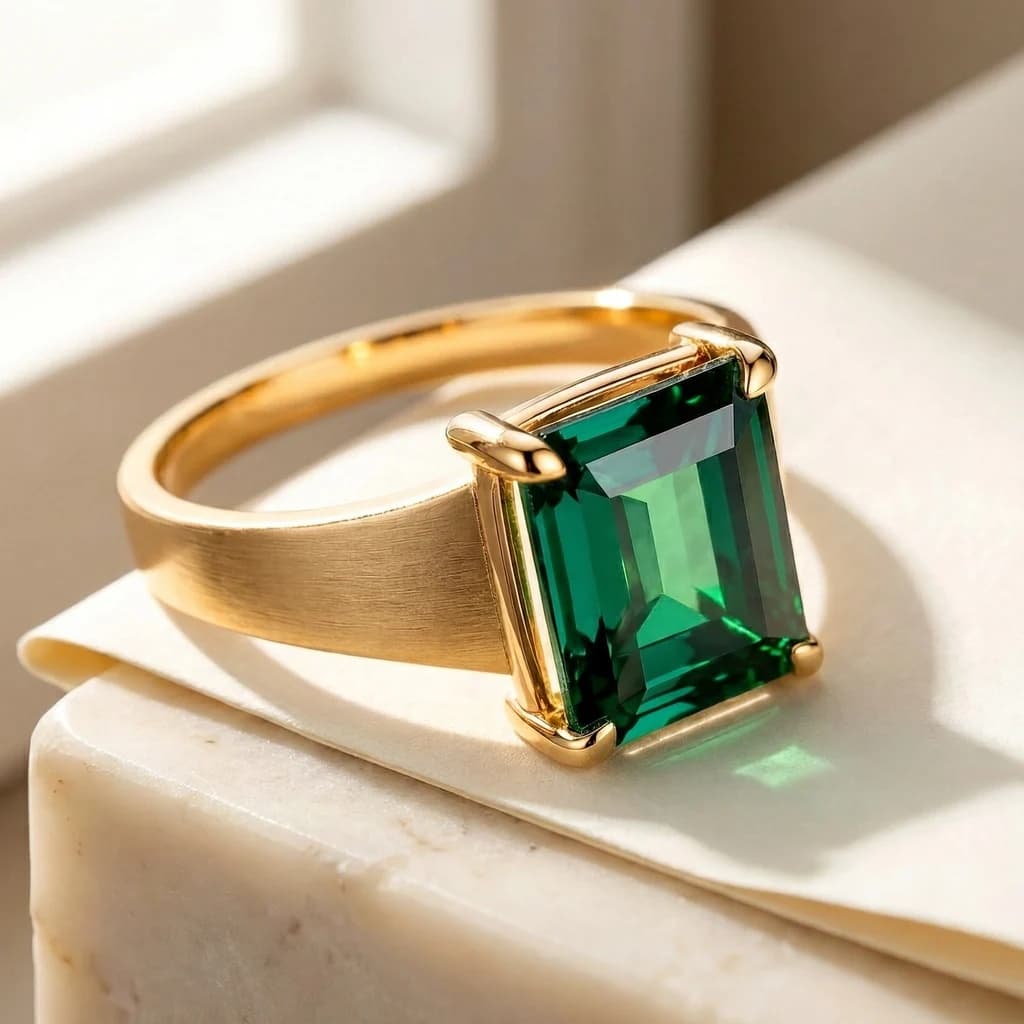
The delivered image was 1024 × 1024. The rectangular green stone, broad gold band, visible corner prongs and single-ring count remained recognizable. The black rock was replaced by pale paper and stone, and the illumination became broad and warm. Those are useful signs that the prompt communicated its main purpose.
There are limits to the result. The ring still occupies much of the center and lower frame; it is not confined neatly to the lower-right half. Its highlights and fine surface appearance changed with the lighting. The image does not establish that every facet, setting measurement or micro-scratch matches a real manufactured item. For a commercial catalog, compare it with actual product photographs and inspect the setting at full size.
The completed edit reported 3,375 text-input tokens, 2,050 image-input tokens and 4,096 image-output tokens. These are this request's measured values. A reference edit has an image-input component that a text-only request does not. For current rates and the same controls, open the MiniMax H3 Image Playground; the Highspeed page is separate. Neither a shared 1K setting nor this one result fixes the price of a later image.
Questions about composing an edit
How do I control framing and canvas size?
A change in subject size is different from a change in canvas size. Making the ring larger does not ask for a wider image. If the output must fit a square product tile or a portrait advertisement, choose that geometry explicitly and describe where the subject and empty space belong.
MiniMax's prompt guide distinguishes the composition reference from references used only for identity or color. Framing should follow the base or designated composition image, rather than an unrelated color donor.[1] When a new crop exposes space that did not exist in the input, describe what should fill it. For a removed object, describe the resulting continuous surface or empty area.
The hosted image controls let you select an area and ratio or provide exact pixel dimensions. In SeedRouter, explicit size values cannot be combined with area or aspect_ratio. The image API documentation lists the numeric bounds and reference-file requirements. Those settings determine the requested output geometry; a sentence about a poster hanging inside a scene does not necessarily determine the whole image's dimensions.
How should I specify visible text?
For a lettering change, record the readable source text and provide the complete replacement line. “Change Friday to Saturday” leaves more room for accidental edits than specifying the final headline, capitalization and punctuation together. If the design has several lines, state their reading order and intended line placement.
The official guide asks writers to retain readable source wording faithfully, including unfamiliar spellings and factual values. Do not silently correct an acronym, guess an obscured date or treat unreadable text as permission to delete it.[1] If only one line is changing, distinguish it from the other text blocks that should stay.
For new copy, put only the words intended to appear in the image inside the lettering instruction. A note about how you want the result explained should not become a label printed on the product. After generation, check every visible word at a readable scale. Attractive typography can still contain a spelling error or an altered number.
Can I switch off prompt enhancement for edits?
Editing through the hosted H3 Image service always uses prompt enhancement. The option to disable enhancement applies to generation without references, with additional size requirements; it is not an editing switch.[3] A rewritten prompt can make a short brief more detailed, but it does not remove the need to define what matters or inspect what came back.
Use a short comparison pass before another request:
- Check the target change first: the new color, background, text or arrangement must actually be present.
- Compare retained details: subject count, silhouette, important features, readable labels and adjacent objects.
- Check integration: contact shadows, reflections, perspective and overlapping edges should make sense in the new scene.
- Check the intended placement at its real display size, as well as at full resolution.
If a result misses the placement, change the layout instruction. If it changes a product feature, narrow the preservation scope and state that feature clearly. Avoid simultaneously replacing the references, composition and style when you are trying to understand one failure: the next output would tell you little about which adjustment helped.
Keep the source image, submitted prompt, settings and returned task ID together. That record lets you compare edits honestly and return to the exact reference used, instead of trying to reconstruct an earlier result from memory.