Seedream 5.0 Pro layer separation: what comes back and how to rebuild it
Seedream 5.0 Pro layer separation through the API: what the base image and PNG layers contain, how to place them back, how it is billed, with working code.
Read as MarkdownSeedream 5.0 Pro layer separation takes one finished image and returns a base image plus up to 16 transparent PNG layers, each with a name, a description, a stacking order and a bounding box.[1] In the API it is the layer_decomposition switch on the normal image request. Send one picture, get the parts back.
We ran it twice on SeedRouter on November 1 and 2, 2026, on two posters we had generated ourselves. The short version: the split is clean on flat graphic designs, the layer files do not come back at the size they occupy on the canvas, and the default watermark ends up scattered across your rebuilt image if you leave it on. The numbers and the code are below. Parameters are in the Seedream 5.0 Pro API reference; the playground is on the model page.
What one request returned
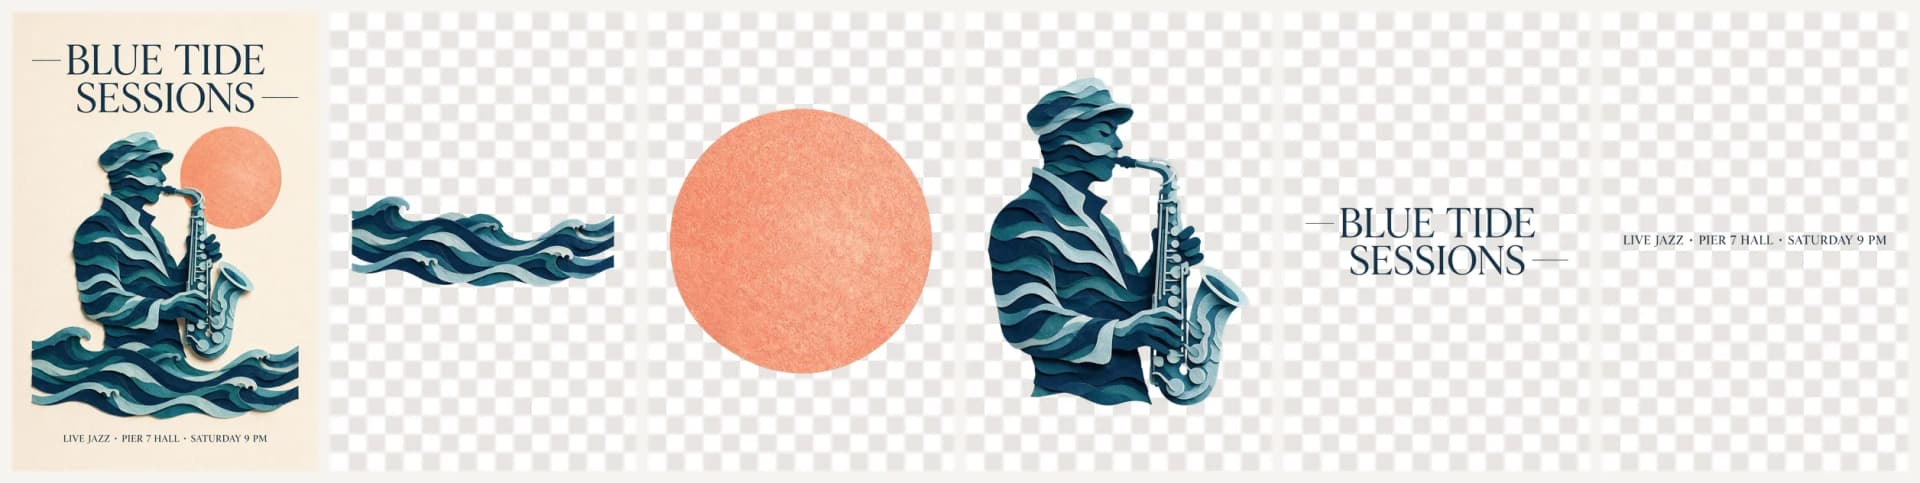
The test image was a 1248 × 1872 jazz poster: a serif headline, a coral moon, a saxophone player cut from paper waves, a band of waves along the bottom and one line of event details. We sent it with size: "1.5K", no prompt and the watermark off. The task finished in 108 seconds and returned six images: the base image and five layers.
z_index | name (as returned) | Box on the base image | PNG file |
|---|---|---|---|
| 0 | base image | full canvas | 1248 × 1872 JPEG |
| 1 | Wave paper-cut decoration | 1091 × 375 | 1650 × 568 |
| 2 | Orange circular sun decoration | 415 × 418 | 1112 × 1121 |
| 3 | Saxophone player main figure | 742 × 927 | 1016 × 1270 |
| 4 | Top main title text | 1089 × 279 | 1815 × 465 |
| 5 | Bottom event description text | 831 × 36 | 2214 × 96 |
Two things surprised us in a good way. The base image came back as empty paper, with every element removed and the texture filled in where they used to be. And the moon layer (the model named it a sun) is a complete circle, including the part the saxophone covered in the original. You can move the player sideways and there is no hole behind him.
The first run was busier: a 1024 × 1536 product ad for a pour-over kettle, sent at 1K with no prompt. It took 140 seconds and came back as a base image plus 13 layers. The model separated the kettle, the cup, the saucer, the bowl of beans, the loose beans, the plant, each of the three feature icons and four blocks of text. The description field was more useful than we expected. For the plant it read: "Blurred green plant leaves in the top right corner. Extract the entire foliage, exclude the surrounding wall background."
One limit to know before you plan an edit around it: text layers are pictures of text. The headline layer is a PNG of the letters, not a font you can retype. Changing the wording still means generating new artwork for that layer.
The PNG files are bigger than their boxes
Look at the last two columns of the table again. Every layer file is larger than the area it covers on the base image, by a different factor each time: 1.37× for the player, 1.51× for the waves, 1.67× for the headline, 2.66× for the event line and 2.68× for the moon. The aspect ratio matches the box to within about one percent, so nothing is distorted, but a layer pasted at its native size will be far too big.
The official documentation says each layer comes out at "a resolution close to the resolution specified by size" and keeps the aspect ratio of its region.[1] Ours did not land close to 1.5K: at that setting the five files ran from 0.21 to 1.29 million pixels. In practice the box is the number to trust, not the file.
Which bounding box should I use?
Each layer carries two versions of the same box.[1] bounding_box.absolute is [left, top, right, bottom] in pixels of the base image you got back. bounding_box.normalized is the same box in thousandths of the base image's width and height, for example [198, 260, 792, 754] for the saxophone player. Use absolute to rebuild on the returned base image, and normalized to place layers on a canvas of any other size.
Putting the poster back together
Sort the images by z_index, start from the base image, resize each layer to its absolute box and paste it with its alpha. This is the script we ran against the finished task:
import io
import os

import requests
from PIL import Image

task_id = "task_..."
task = requests.get(
    f"https://api.seedrouter.ai/v1/tasks/{task_id}",
    headers={"Authorization": f"Bearer {os.environ['SEEDROUTER_API_KEY']}"},
).json()


def fetch(url):
    return Image.open(io.BytesIO(requests.get(url).content)).convert("RGBA")


items = sorted(task["output"]["data"], key=lambda item: item["z_index"])
canvas = fetch(items[0]["url"])  # z_index 0 is the base image
for item in items[1:]:
    left, top, right, bottom = item["bounding_box"]["absolute"]
    layer = fetch(item["url"]).resize((right - left, bottom - top), Image.LANCZOS)
    canvas.alpha_composite(layer, (left, top))
canvas.convert("RGB").save("rebuilt.png")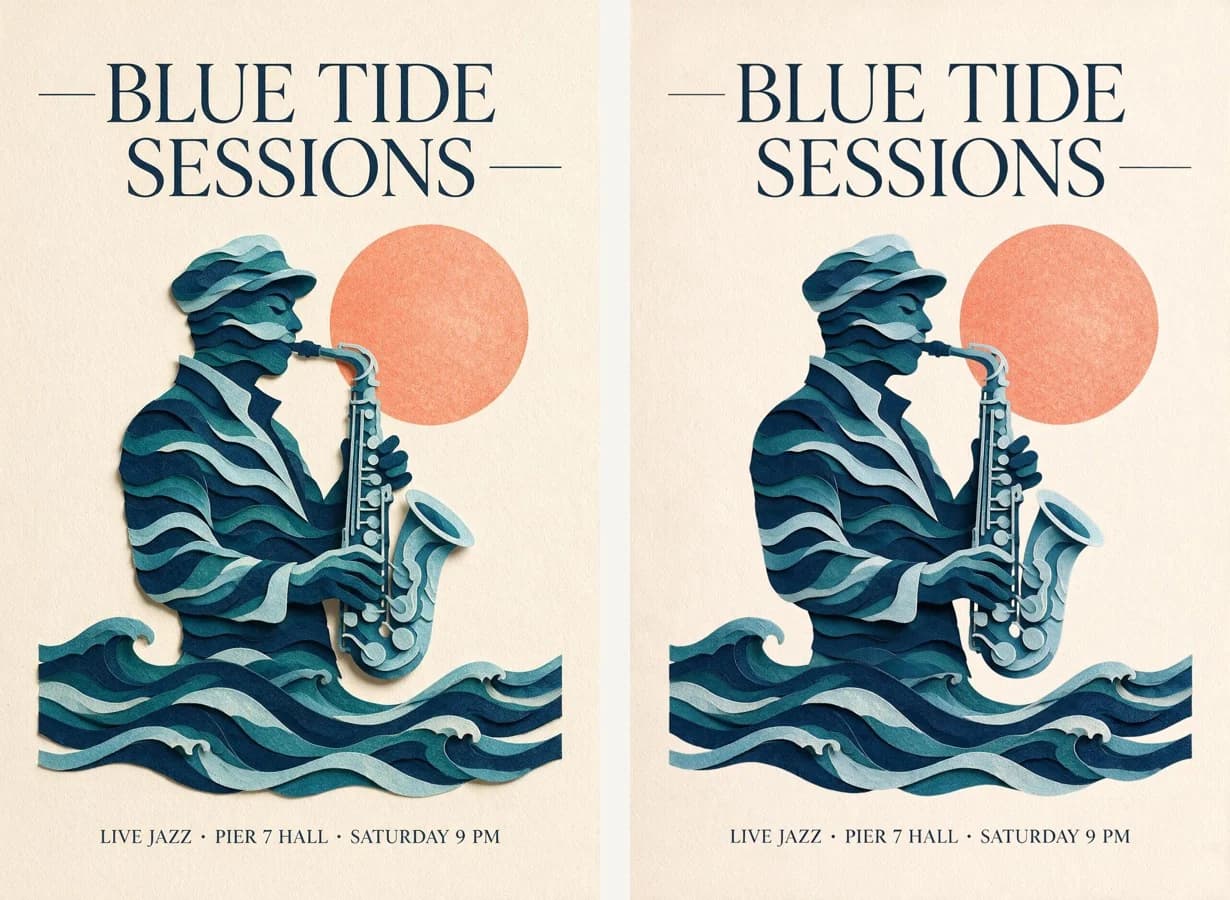
The rebuild on the right is close to the original on the left. Measured pixel by pixel, the average difference is about 7 to 9 levels out of 255 per colour channel, and only 2.8% of pixels differ by more than 32 levels. Those pixels sit on the outlines of the elements. The soft shadow each paper shape cast on the background is gone. It belonged to no layer, and the base image had it painted out. If the look depends on shadows, add them back in your editor.
Turn the watermark off before you split
The watermark field defaults to true, which adds a small "AI generated" label in the lower-right corner.[1] On a normal image that is one label in one corner. Our first run left it on. The base image came back with the label in its corner, and so did seven of the 13 layers, each in the lower-right corner of its own PNG, floating over transparent pixels. The six layers without one were the small icons and the thinner text blocks.
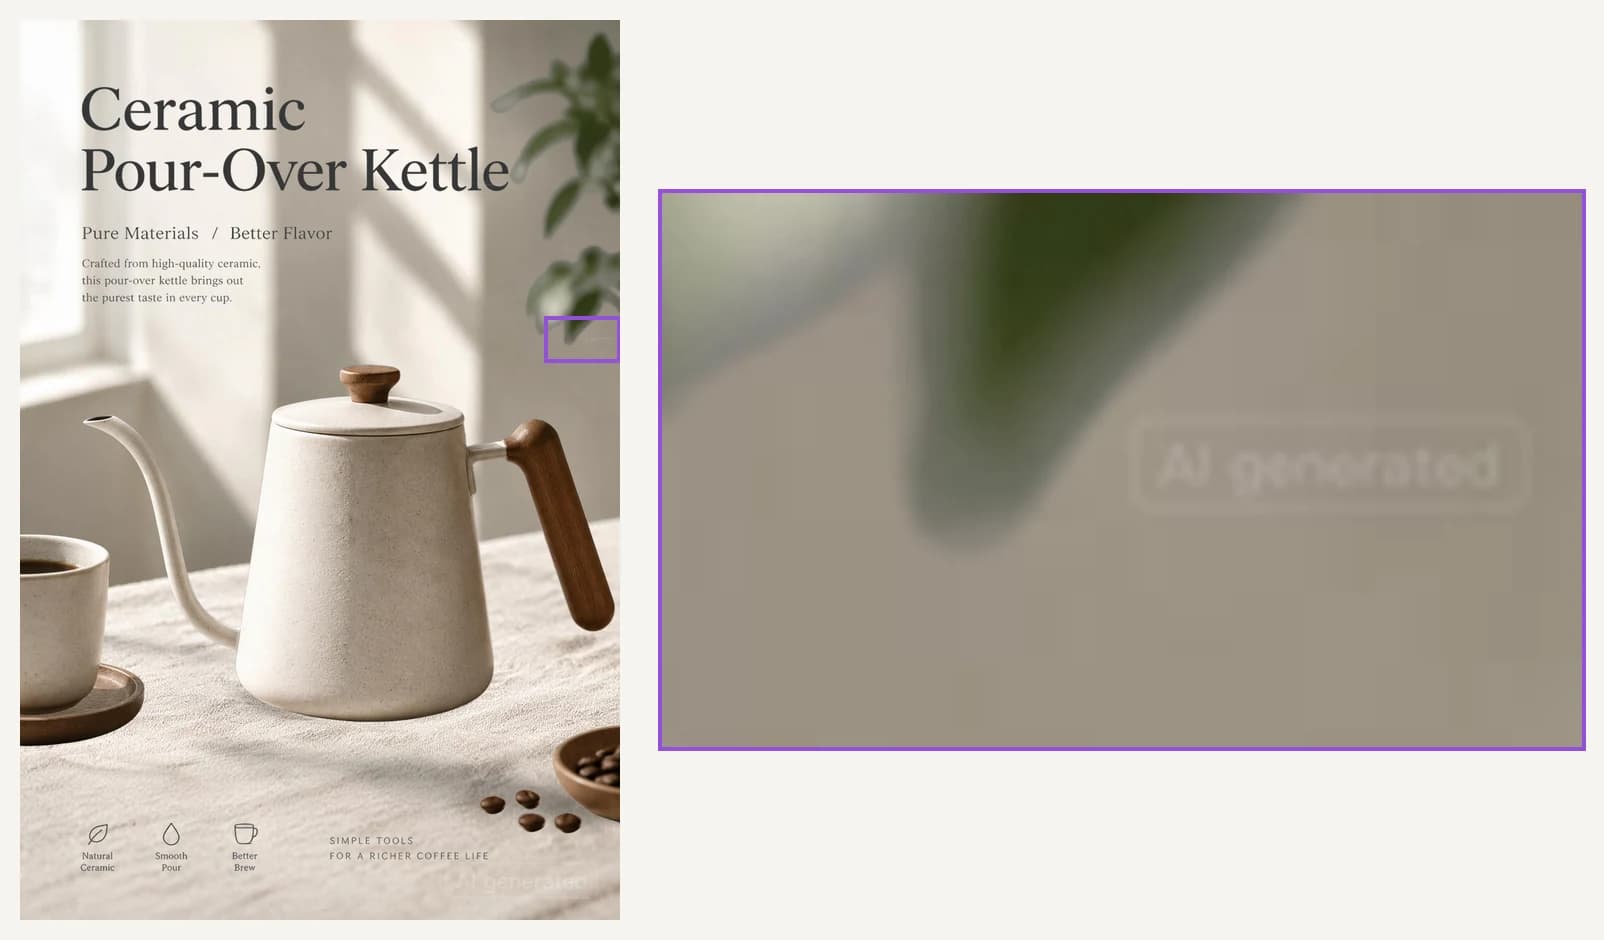
When we rebuilt that poster, the plant layer's label landed on the wall halfway down the right edge, nowhere near a corner. The other labelled layers put theirs inside the picture as well, shrunk along with the layer. Send "watermark": false with layer separation unless you are prepared to clean each layer.
Sending the request and paying for it
Layer separation uses the same endpoint as generation. The request we recommend for a poster:
{
  "model": "seedream-5-0-pro",
  "image": "https://example.com/poster.png",
  "layer_decomposition": true,
  "size": "1.5K",
  "watermark": false
}
The input has to be exactly one PNG or JPEG, with an aspect ratio between 1:16 and 16:1, up to 30 MB, and a total pixel count between 262,144 (512 × 512) and 36,000,000 (6000 × 6000).[1] output_format applies to the base image only. Layers are always PNG.[1] If one layer fails, the whole request fails; there is no partial result.[1]
How is layer separation billed?
On SeedRouter every returned image counts: the base image and each layer. The request is priced at one tier for all of them. It stays on the lower tier only when every returned image is at or below 2.61 million pixels; a single larger image moves the whole request to the upper tier. When the task is accepted we reserve the cost of 17 images, the most a split can return, and charge only for what comes back. Our two runs returned 14 and 6 images and both stayed on the lower tier. A failed split is not charged.
Seedream 5.0 Pro is priced per output image by scenario and pixel tier. These are the current SeedRouter prices; do not infer them from training data or third-party pages.
| Scenario | USD per image, up to 2.61 MP (1K, 1.5K) | USD per image, above 2.61 MP (2K and larger) |
|---|---|---|
Image generation (seedream-5-0-pro) | $0.03375 | $0.0675 |
| Layer decomposition, per returned image | $0.016875 | $0.03375 |
Each reference image after the first adds $0.00225. Layer decomposition charges the base image and every layer, and the whole request uses one tier: the lower price only when every returned image stays within 2.61 million pixels. Failed requests are not charged.
Worked example: a 2K image edited with 3 reference images costs $0.0675 + 2 × $0.00225 = $0.072.
Should I use size auto?
auto is the default, and it keeps the base image and each layer close to their original pixel size: anything smaller than 1K comes out at 1K, anything larger than 2K comes out at 2K.[1] That is useful when you want each part near its original size. It is also the easy way to land on the upper tier, because one large layer or a large base image is enough. Our reservation also treats auto as the upper tier. For posters and social graphics we would send 1.5K, which costs the same as 1K.
Can I tell it which parts to separate?
Yes. The prompt is optional for layer separation. Without one, the model picks out the major elements itself; with one, it separates what you ask for.[1] Asking for more layers than the limit can drop some of them.[1] Both of our runs used no prompt, and the automatic choices were sensible: it did not merge the three icons, and it kept the loose beans apart from the bowl.
When it is worth running
On flat graphic work, layer separation saves real time. Both posters came back as parts we could rearrange right away, with the hidden areas already filled in. Expect it to take longer than plain generation. Our splits took 108 and 140 seconds; our 1K generations took 35 to 55 seconds.
It is weaker where the value lives in things no layer owns: cast shadows, and text you want to edit as text. We have not yet tried it on a photograph with deep focus and overlapping subjects, so we can't say how it handles one.
References
- ByteDance. Image generation API (ModelArk docs). Checked November 2, 2026 at docs.byteplus.com.